Word Smart Art How to Change Text Box to Picture
You tin change the position of a text box (and the text within it), shape, WordArt, or a picture by rotating or flipping information technology.
If you're working in email, run into Rotate a picture in Outlook.

Select a heading beneath to open it and encounter the detailed instructions.
-
Click the object that y'all want to rotate.
-
Click the rotation handle at the height of the object, so drag in the direction that yous desire.

-
To constrain the rotation to xv-degree increments, press and hold Shift while you drag the rotation handle.
-
When you rotate multiple shapes, they do not rotate as a grouping, simply instead each shape rotates around its own centre.
-
-
Click the object you desire to rotate.
-
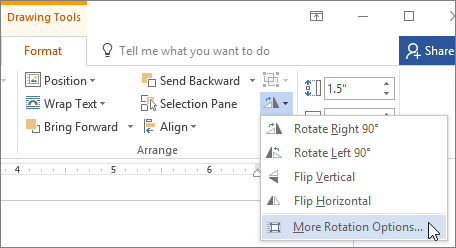
Under Drawing Tools (or Pic Tools if you're rotating a picture), on the Format tab, in the Accommodate group, click Rotate, and so click More Rotation Options.
-
In the pane or dialog box that opens, enter the amount that you want to rotate the object in the Rotation box. You can also utilise the arrows to rotate the object exactly where you want.
If yous don't see the Cartoon Tools or Picture Tools Format tabs, make certain that y'all've selected a text box, shape, or WordArt. You may take to double-click the object to open the Format tab.
-
Click the object that you want to rotate.
-
Under Drawing Tools (or Picture Tools if y'all're rotating a picture), on the Format tab, in the Arrange group, click Rotate, and and so:
-
To rotate the object ninety degrees to the correct, click Rotate Right xc°.
-
To rotate the object 90 degrees to the left, click Rotate Left 90°.
-
If you don't see the Drawing Tools or Picture Tools Format tabs, brand certain that yous've selected a text box, shape, WordArt or picture. You may have to double-click the object to open up the Format tab.
You lot can create the issue of a mirror image or flip an object upside-downward (invert it) by using the Flip tools.
-
Click the object that you want to rotate.
-
Under Cartoon Tools (or Motion-picture show Tools if you're rotating a movie), on the Format tab, in the Arrange grouping, click Rotate, and then:
-
To plough an object upside-down, click Flip Vertical.
-
To create a mirror prototype of the object, click Flip Horizontal.
-
If you don't see the Cartoon Tools or Movie Tools Format tabs, make sure that y'all've selected a text box, shape, WordArt or picture. Yous may have to double-click the object to open up the Format tab.
When you rotate an object, any text within the object will rotate with it. However, text inside a flipped object is non automatically flipped with the rotation tool. To reverse text forth with the object that contains it, y'all can exercise the following in Outlook, Excel, and PowerPoint.
-
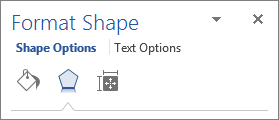
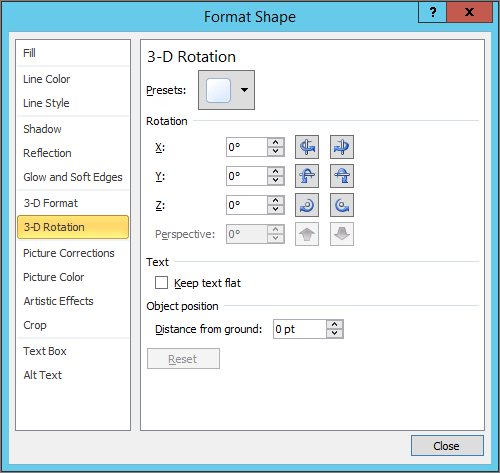
Select and then correct-click the object you want to reverse, and then click Format Shape.
-
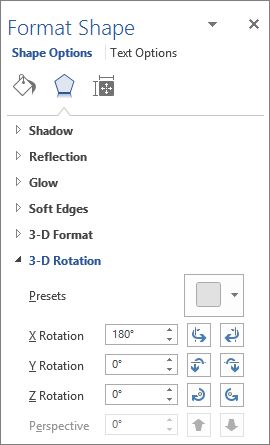
In the Format Shape pane, under Shape Options, click Effects.
-
Under three-D Rotation, in one of the Rotation boxes (X, Y, or Z, depending on how you lot want to rotate your text), enter 180.
Notes:
-
Irresolute the rotation may touch on the fill color of your object. You can adjust your fill up color in the Format Shape pane on the Fill & Line
 tab.
tab. -
When you click in the object to edit the text, it volition revert back to its original appearance temporarily while you edit information technology. The reversed appearance will be reapplied when yous are done editing text and y'all click outside of the object.
-
Important: Function 2010 is no longer supported. Upgrade to Microsoft 365 to work anywhere from any device and go on to receive support.
Upgrade now
Select a heading below to open it and see the detailed instructions.
-
Click the object that you want to rotate.
-
Click the rotation handle at the height of the object, then drag in the management that you want.
Annotation:To constrain the rotation to 15-degree increments, press and hold Shift while you drag the rotation handle.
-
Click the object you want to rotate.
-
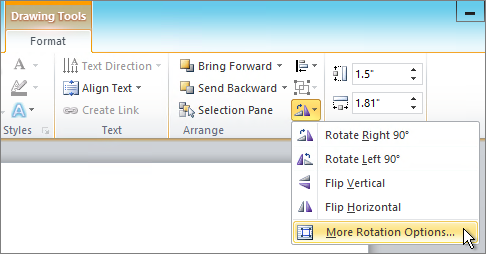
Under Drawing Tools (or Picture Tools if you lot're rotating a film), on the Format tab, in the Arrange group, click Rotate, so click More Rotation Options.
If y'all don't see the Moving picture Tools, Drawing Tools, or Format tabs, make sure that you've selected a picture. You lot may take to double-click the moving picture in gild to open up the Format tab.
-
In the pane or dialog box that opens, enter the amount that yous want to rotate the object in the Rotation box. You lot can besides employ the arrows to rotate the object exactly where yous desire.
You can create the outcome of a mirror prototype or flip an object upside-downward (invert it) past using the Flip tools.
-
Click the object that y'all want to rotate.
-
Under Drawing Tools (or Motion-picture show Tools if you're rotating a flick), on the Format tab, in the Arrange group, click Rotate, and so practice 1 of the following:
-
To turn an object upside-down, click Flip Vertical.
-
To create a mirror image of the object, click Flip Horizontal.
-
If you lot don't see the Drawing Tools or Flick Tools Format tabs, make certain that you've selected a text box, shape, WordArt or picture show. You lot may have to double-click the object to open the Format tab.
When you lot rotate an object, any text inside the object will rotate with it. However, text within a flipped object is not automatically flipped with the rotation tool. To reverse text along with the object that contains it, you can do the following in Outlook, Excel, and PowerPoint.
-
Select and then correct-click the object yous want to reverse, and so click Format Shape.
-
In the Format Shape dialog box, click 3-D Rotation on the left.
-
In ane of the Rotation boxes (X, Y, or Z, depending on how you want to rotate your text), enter 180.
Notes:
-
Irresolute the rotation may impact the fill colour of your object. You can adjust your fill color in the Format Shape dialog box on the Make full tab.
-
When you click in the object to edit the text, it will revert back to its original appearance temporarily while you edit information technology. The reversed appearance volition be reapplied when you click outside of the object.
-
-
Click the object that you want to rotate.
-
Click the rotation handle at the top of the object, so drag in the management that you want.
-
To constrain the rotation to fifteen-degree angles, press and hold Shift while you drag the rotation handle.
-
When you rotate multiple shapes, they do not rotate as a grouping, only instead each shape rotates around its own center.
-
Alternatively you can select the object, hold down Option and press the left or right arrow keys to rotate.
-
-
Click the object you want to rotate.
-
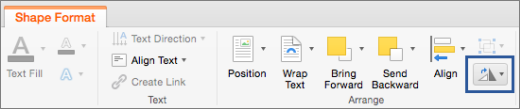
On the Shape Format tab or Picture Format tab, in the Adjust grouping, click Rotate.
-
If y'all don't come across the Shape Format or Picture Format tabs, brand sure that you selected a text box, shape, WordArt, or pic.
-
The Rotate push button could exist hidden if your screen size is reduced. If you lot don't see the Rotate button, click Arrange to see hidden buttons in the Arrange group.

-
-
Click More Rotation Options.
-
In the dialog box or pane that opens, enter the amount that y'all desire to rotate the object in the Rotation box. You can likewise use the arrows to rotate the object exactly where you want.
-
Click the object you want to rotate.
-
On the Shape Format tab or Moving-picture show Format tab, in the Accommodate group, click Rotate.
-
If you don't see the Shape Format or Picture Format tabs, make sure that you selected a text box, shape, WordArt, or picture.
-
The Rotate button could be hidden if your screen size is reduced. If you don't run across the Rotate button, click Conform to see hidden buttons in the Arrange grouping.
-
-
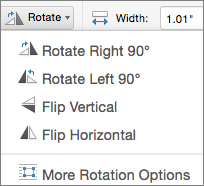
To rotate the object ninety degrees to the right, click Rotate Right 90°, or to rotate the object 90 degrees to the left, click Rotate Left xc°.
You lot can create the effect of a mirror image or flip an object upside-down (capsize it) by using the Flip tools.
-
Click the object that y'all desire to rotate.
-
On the Shape Format tab or Pic Format tab, in the Arrange grouping, click Rotate.
-
If you lot don't see the Shape Format or Motion picture Format tabs, make sure that you selected a text box, shape, WordArt, or moving picture.
-
The Rotate push button could exist hidden if your screen size is reduced. If you don't see the Rotate button, click Arrange to come across hidden buttons in the Arrange group.
-
-
Do one of the following:
-
To plow an object upside-down, click Flip Vertical.
-
To create a mirror prototype of the object, click Flip Horizontal.
-
-
Click the object that you want to move.
-
Drag the object to where you want information technology.
-
To move multiple objects, hold down Shift as you select the objects.
-
To move an object up or down, or sideways in small increments, click the object, hold downward Command, and then press an arrow key. Note that in Give-and-take yous can merely use this to motion upwardly or downward.
-
To constrain an object so that information technology moves just horizontally or vertically, hold downwards Shift as you elevate the object.
-
When you group objects, you are combining the objects together then that you tin can format, move, or copy them equally a grouping.
-
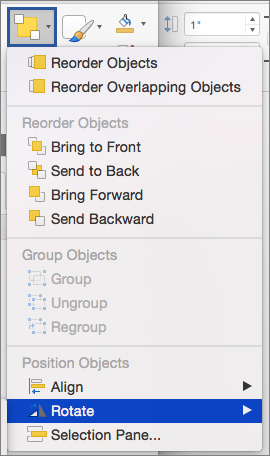
Hold down Shift, click the objects that you want to group together, and then depending on the type of object that you clicked, click the Shape Format tab or the Motion-picture show Format tab.
-
Click the Grouping icon, and then click Group.
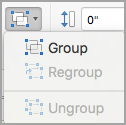
Tip:If Group appears dimmed or unavailable that's unremarkably because you haven't already selected two, or more than, objects that tin be grouped together.
See also
Insert pictures in Office for Mac
Crop a moving-picture show
Rotate to whatever bending
-
Click the object that you want to rotate.
-
Click the rotation handle at the top of the object, and then elevate in the direction that y'all desire.
Reverse text
Meet the commodity Reverse or mirror text.
Rotate a table or a SmartArt graphic
Copy the tabular array or SmartArt graphic, paste it as a picture, and and then rotate the flick.
Meet also
Wrap text around a circle or other shape
Crop a picture show
Group or ungroup shapes, pictures, or other objects
Source: https://support.microsoft.com/en-us/office/rotate-or-flip-a-text-box-shape-wordart-or-picture-399e7a92-87e9-4d86-a03a-be120056fe3b
0 Response to "Word Smart Art How to Change Text Box to Picture"
Post a Comment